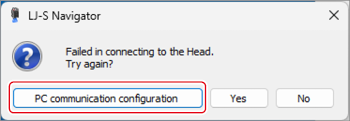
This section explains the procedures for setting communication according to the IP address of the PC to be connected, and how to reset the head’s IP address.
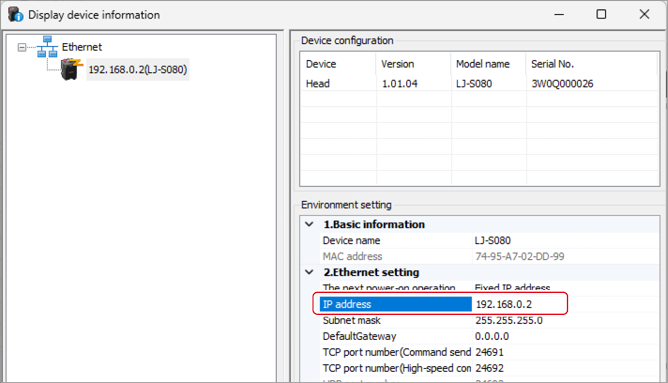
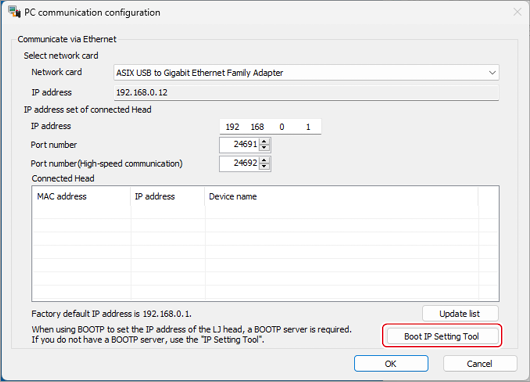
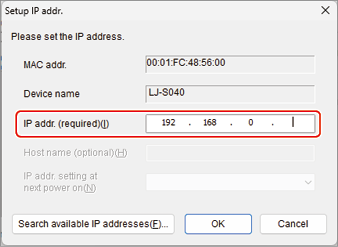
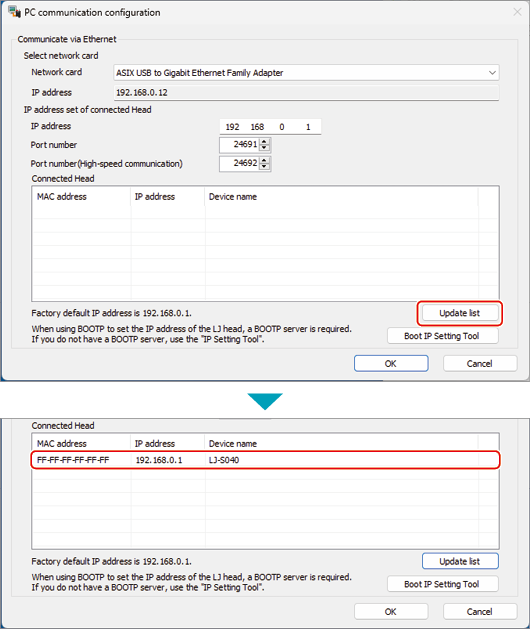
*The subsequent procedure assumes that the head’s IP address is set to the factory default “192.168.0.1” (default). |
Check which of the Conditions, I to IV, applies to the PC IP address, and make settings by following the procedure described for the condition.
- Condition I: When the PC IP address is 192.168.0.2 - 192.168.0.255
- Condition II: When the PC IP address is other than 192.168.0.2 - 192.168.0.255, and it can be changed
- Condition III: When the PC IP address is other than 192.168.0.2 - 192.168.0.255, and it can be temporarily changed
- Condition IV: When the PC IP address is other than 192.168.0.2 - 192.168.0.255, and it cannot be temporarily changed
Condition I
When the PC IP address is 192.168.0.2 - 192.168.0.255
- Connect the head with the PC, and start the LJ-S Navigator.
- Check if the settings have been correctly made.
Once the head is connected, from the [Setting] menu on the tool bar, click [PC communication configuration] and check the current communication settings.
If two or more network cards are installed in the PC, check whether the correct network card is selected, and if necessary, change the setting.
If the head cannot be connected
If the head cannot be connected, take the procedure below to reset the head’s IP address to “192.168.0.1” (default).
After that, perform the steps 1 and 2 above.
- Check that the head is powered on and remove the head’s top cover (secured with screws in two places).
- Insert a thin pin into the [IP RESET] button, and push it in until the laser radiation LED flashes green in 1-second cycles (approximately 3 to 7 seconds).
*If the pin is pushed in and held for 8 seconds or more, the IP address will be reset to “Not set.”
Condition II
When the PC IP address is other than 192.168.0.2 - 192.168.0.255, and it can be changed
- Change the IP address of the PC to be connected, to 192.168.0.2 – 192.168.0.255.
- Connect the head with the PC, and start the LJ-S Navigator.
- Check if the settings have been correctly made.
Once the head is connected, from the [Setting] menu on the tool bar, click [PC communication configuration] and check the current communication settings.
If two or more network cards are installed in the PC, check if the correct network card is selected, and if necessary, change the setting.
If the head cannot be connected
If the head cannot be connected, take the procedure below to reset the head’s IP address to “192.168.0.1” (default).
After that, perform the steps 1 and 2 above.
- Check that the head is turned on and remove the head’s top cover (secured with screws in two places).
- Insert a thin pin into the [IP RESET] button, and push it in until the laser radiation LED flashes green in 1-second cycles (approximately 3 to 7 seconds).
*If the pin is pushed in and held for 8 seconds or more, the IP address will be reset to “Not set.”
Condition III
When the PC IP address is other than 192.168.0.2 - 192.168.0.255, and it can be temporarily changed
- Change the IP address of the PC to be connected, to 192.168.0.2 – 192.168.0.255.
*Note down the IP address before changing it so that you can restore the IP address later.
- Connect the head with the PC, and start the LJ-S Navigator.
- Change the head’s IP address.
From the [Setting] menu on the tool bar, click [Device information].
Rewrite the IP address according to the original IP address of the PC to be connected.
Example When the PC IP address (before change) is “169.254.0.1” and the subnet mask (before change) is “255.255.255.0,” rewrite the head IP address to “169.254.0.2” - “169.254.0.255.” |
- Press [Send setting], and a message appears, asking whether to restart the head. Select [Yes].
Once the head restarts, the head’s IP address will be changed to the set IP address.
- Reset the IP address of the PC to be connect, to the original IP address.
- Connect the head with the PC, and start the LJ-S Navigator.
- Check if the settings have been correctly made.
Once the head is connected, from the [Setting] menu on the tool bar, click [PC communication configuration] and check the current communication settings.
If two or more network cards are installed in the PC, check whether the correct network card is selected, and if necessary, change the setting.
Condition IV
When the PC IP address is other than 192.168.0.2 - 192.168.0.255, and it cannot be temporarily changed
Change the status of the head IP address to Not set, and use the IP Setting Tool to set the IP address for the head for which no IP address is set.
|
- Reset the head’s IP address to Not set.
Check that the head is powered on and remove the head’s top cover (secured with screws in two places).
Insert a thin pin into the [IP RESET] button, and push it in until the laser radiation LED flashes green in 0.5-second cycles.
(Approx. 8 seconds)
- Install the IP Setting Tool.
When installing the LJ-S Navigator, open the “IP Setting Tool” in the folder unzipped from the file you have downloaded from the support site.
Double-click the “setup.exe” in the folder and follow the on-screen instruction for installation.
- Start the head and LJ-S Navigator, and click [PC communication configuration].
- Click [Boot IP Setting Tool].
- Select the network card to be used, and click [OK].
- The IP Setting Tool screen appears. Select the head from the list and click [Setup IP addr.].
- Click [Search available IP addresses], and search for available IP addresses.
- When an available IP address is found, enter it in the [IP addr. (required)] field, and click [OK].
- Click [Exit].
- Click [Update list], and from the [Connected Head] list, select the head to be connected and click [OK].
- Click [Yes] to start the LJ-S Navigator, which has been successfully connected.